Will’s Final Review
I started at The Boleh project in November 2012, as marine engineer apprentice, as we all had no experience in boat building we started with bench joinery and practicing joinery, then we slowly progressed into the restoration of Boleh. Over the 18 months I attend my goals were to achieve and finish my apprenticeship and also improve my employability and develop my personal skills, for example working and dealing with other people during tasks and problem solving.
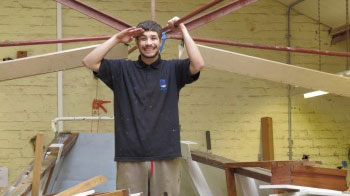
I have very much enjoyed my time at the Boleh project and I am very grateful for the skills I learnt and fine tuned and am very grateful for the opportunity you gave me.
Cave/Personal Lockers
Cave/Personal Lockers
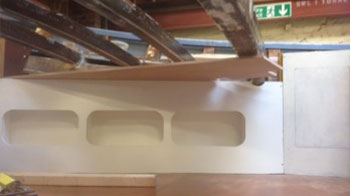
My next job at Boleh was to create the personal lockers and the cave lockers port and starboard sides of the V berth. To create these I measured the faces of the lockers and used the table saw to cut them out. Next I made a template for the sides of the personal lockers using 6 mm plywood hot glued together. I then used the template to mark out and cut out he sides of the lockers. I then looked at the boat drawing for the dimensions of the boxes to make the cave lockers, I noticed that if I made them to the dimensions of the drawing there would be unutilised space, so I amended the drawing and created new size cave lockers.
Next I marked out the cut outs for the openings of the lockers, I cut these out with a jigsaw and trimmed the edges with a router. These were then sealed with G4 and then painted and secured to the boat.
Dovetail Draw
Dovetail Draw
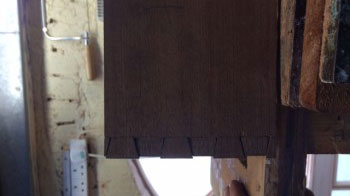
We were each given the task of making a dovetail draw for the boat. First I had to measure the size of the hole it was going into, and the rails for the draw to slide on were already secured in place. Once I had the measurements I proceeded to machine up the correct timber to the right size. When I had completed this I began to mark out the dovetails. I used the bandsaw to cut out the dovetails with square edges and used a tenon saw to cut the bevelled dovetails.
Then it was time to router the slot for the draw too slide on and also router a slot for the bottom of the draw to slide in. after this was completed I then glued the whole thing together ad checked for square using a square and also measuring the diagonal corners of the draw. After the glue had dried I clean off the excess glue and gave it a quick sanding then sealed and varnished the draw. In addition to this I added little slides along the bottom of the draw to help it slide in gently and also a mall catch at the back of the draw to stop it from falling out completely.
Restoring the Dinghy
Restoring the Dinghy
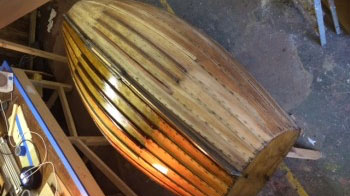
I was given the task of restoring the ships dinghy which was donated to the project in 2008 by James Stock. The dinghy was also very similar to the original dinghy and built around the same time. I started by removing as much of the equipment as possible such as cleats and seats etc. Once these were removed I then sanded down the entire dinghy and whatever equipment was not destroyed or rotten. The capping rail was incomplete on both sides so that was removed and I used the old capping rail as a template to create the new one.
The dinghy was originally a sailing dinghy but this was to be converted into a rowing only dinghy much like Boleh’s original Tender, this meant removing the rudder and rudder stock, the dagger board and dagger board box and remove mast foot step and make good of the locations they were removed from. Then new rowing fixture and fittings were secured to the dinghy such as row locks and oar clamps and in addition to that a small box underneath the seat to hold the oars in place when not in use. Next I then had to manufacture and fit the name plate for ‘Tender To Boleh’. Then I had to seal and varnish the Dinghy.
Want to get involved and Volunteer?
From Skippers to Open Day Stewards, there are lots of ways to get involved – we would love to hear from you!
Sailmakers Visit
Sailmakers Visit
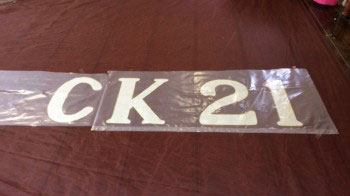
In March myself and another apprentice, Sam were sent to Brightlingsea in Essex to work along side a traditional sailmakers, we learnt that new sails are made from synthetic material and old traditional sails were fabric, and also new rolls of material come in 18″ rolls and older rolls are 12″.
Where the sails can be so large they have no table but use the floor so it must be kept clean at all times only clean shoes can be worn or you will have to work in your socks! They put sewing machines in ‘the pit’ so the can lay the sail out and sew, sometimes the sail is so large it will have to be made in two parts then joined together.
Forward V Berth Arrangement
Forward V Berth Arrangement
After the anchor locker was fitted we then had to make the fit the beams for the forward berth arrangement. The beams were made from Iroko and we machined them in the workshop on site to the right size and length, for this we used the table saw and the thicknesser and planer. The beams were then screwed onto the anchor locker and attached to a half bulk head, which represent the end of the bunk, this also gives a secure point to fix the framework to.
After the Iroko beams were secured, two more additional beams were added, these beams were machined with a bevel on them to create the ‘V’ shaped birth. I then had to fit two panels into the forward berthing arrangement. These were made from half inch plywood and had to be fitted tight to the hull beams and hull on the inside of the boat, this is because this space would be used for storage and did not want anything being stuck behind the panel.
When I had completed this task I then had to sand down all the deck beams on the two sides and the bottom ready for varnishing and painting, after the beams were sanded I had to then sand the beam shelf ready for varnishing and painting too. I had to mix up some varnish sealant with a little bit of thinners in so it’s not too thick. Once the first coat has gone on just before the first coat its dry (should be sticky, not wet) then it time to put the next coat on and repeat process as many times as needed. Bearing in mind the best process to follow would be as many coats of varnish as you can in one day and the last coat should be he undercoat or the primer, this is because if you leave the varnish to go off it will set hard and will become rough to the touch again, this mean you will have to sand.
The next job I was given was to secure some beams parallel to the hull. I could not screw the beams to the actual hull, so instead I secured them both ends by drilling a hole at an angle for the screws to go in easier and not protrude to the other side. I also had to fit 2 trimmer beams to help spread the weight across evenly. Because one end of the trimmer beam finishes next to the hull it had to be angled the same way, I used a halving joint to secure the trimmer beams to the rest of the frame work, and then sealed/stabilised the frames with ‘G4’.
After the frames were finished and the ‘G4’ had completely dried (best left for 24 hours as I will need to fit bunk tops directly onto the framework, if this is done while the beams are still going through the drying process you may leave dirty mar marks or possibly get them stuck together)
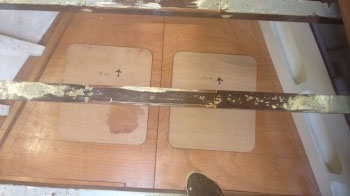
This is a top view of the hatches being marked out on the bunk tops in the forward V birth. Once these were marked out I then chain drilled 2mm holes close to the cut out line as possible, I done this so I could fit a jigsaw blade through the holes and then proceed to cut it out. I had to be particularly carful when cutting this out because I will be re-using the cut out for the hatch.
Once I had cut the hatches out and finished them by hand to make them aesthetically pleasing I then put the back inside the boat to test them. During this point I then noticed that the hatch cover was right on top of the frame work underneath with rendered the hatches useless, therefore some amendments were due. The amendments involved removing the trimmer beams and also moving the frame work closer together, this was so the beams didn’t interfere with the use of the hatches and storage.
To move the centre beams of the frame work I measured 115mm inboard (because this was the direction I needed to move the beams and at that measurement it would give enough clearance for the hatches to be usable) and then proceeded to mark out to make another 4 lap joints for the beams to sit in their new position.
When the beams were in their new positions and secured, I then recycled the trimmer beams by placing them in the notches they were originally sat in and then marked from underneath where to cut them off. Once I had cut them off I then glued and screwed the blocks into place and then filled the joints with filler to prevent any movement. I decided to fill in the notches because if there was a great weight on the bunk tops they would bend and possibly break because of the structure of the beam, so by putting the blocks in the notches I am re-strengthening the framework.
Anchor Locker
Anchor Locker
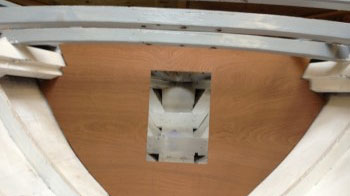
Anchor locker bulk head with a hatch. We were lucky for this job because we have had to remove a bulkhead for a bit further down the boat so we were able to reuse the old bulk head just make it smaller and cut a hatch into it. The edges of the bulk head had to be angled the same was and the shape of the hull. Once it was cut out to the correct size and the hatch was cut in it was tie to secure the bulkhead to the boat, we secured it with a couple of screws at the bottom for now.
A follow up task from this task was to line the anchor locker with some half inch plywood. First of all I measured the rough length of plywood I would need and then began to drill clearance and pilot holes for fixing the wood to the boat. Because they were being fitted on to one of the hull beams, as it is fixed down it will bend and alter the shape slightly, so to counter act this I fixed the board down and marked where I needed to plane for the piece of wood to sit tight against the bulkhead.
Where the beams meet at the keel, also had to be lined with half inch ply and I had to cut a hole big enough for a keel bolt to go through.
To secure the anchor locker bulkhead and the ply toppers, I glued and screwed them using polyurethane wood adhesive, which is a quick setting glue. This will help stop and movement in the joint and prevent further damage. The screws are there for additional support and to hold the job in place while the glue dries.
Want to volunteer?
From Skippers to Open Day Stewards, there are lots of ways to get involved – we would love to hear from you!
Trestle and Dimension Frame
Trestle and Dimension Frame
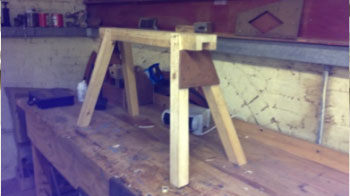
The next task we were given at Boleh was to make up some trestles each. We were given prepared timber to use. I started by cutting a halving joint at a bevel on the trestle and then cut another bevel onto the legs of the trestle so they would kick the legs out further, so when you put weight on the trestle it won’t tip, the bevel for is very critical. We the added some plywood between the legs for strength.
The following week we were told we will be making dimension frames with a different joint in each corner. The joint shown is a dovetail and the angle of the dovetail depends if you are using hardwood or softwood. Softwood ratio: 6:1 Hardwood ratio: 8:1
This joint pictured here is called a halving joint and is very basic joinery. The other two joints used are called mortise and tenon joints. One of the mortise and tenon joints are called a haunched mortise and tenon, and is the same joint they use to put doors together.
When I was making the dimension frame, I had internal and external measurements to stick to. When gluing the frame together it is very important that you put it together with no glue at first to see if it’s all square and level, then once I had glued it I had to make sure it stayed square and level.
Tool Box
Tool Box
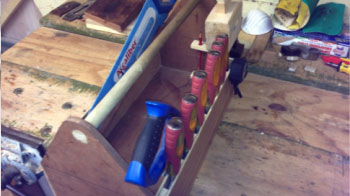
The first task we were given at Project Boleh was to make our own tool boxes. We made these from mostly marine plywood and odd bits of pine from around the workshop.
I measured and cut out the pieces of plywood I will need for the toolbox, I made the two end walls of the box out of ½ inch plywood and the two sides and bottom of the box are made from ¼ inch plywood and the handle will be made from an off cut of a broom handle.
I then made some pockets for my chisels to sit in, out of odd bits of pine round the workshop and gluing them to the walls of my tool box, I then cut out another piece of plywood the same height and length and the walls of the box to make the pockets. I will make further adjustments if I accumulate more tools.
This is my finished tool box, I now have a place to hold both my saws and other pockets to hold various other tools including my mallet, marking gauge, tape measure and pencils.
Miniature Door Frame
Miniature Door Frame
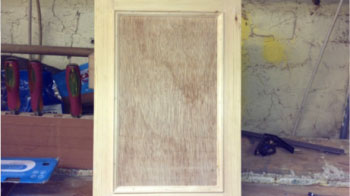
For another task at Boleh we were going to be making up a miniature door frame exactly how you would make a normal size door. For this we also started with prepared wood so there was no need to check any measurements.
We first ran a length of timer across the router table for and OGEE moulding and on the opposite side we cut a groove to accept a sheet of thin plywood in this case. We then had to make the joints to fit this together, called a mortice and tennon.
After we had made the mortice and tennon joints in each corner we then had to mitre the mouldings in each corner too. We use a mortice a tennon joint for door frames because the haunch in the mortice holds the tennon in place so you can cut off the extra and the joint will still hold firm.


